 By Colin Foster
The best backpack for through hiking is the one that carries your full resupply load comfortably for weeks at a time, without wearing down your shoulders, hips or budget on wear-and-tear repairs. This guide walks through how to size a pack, compare frame and suspension designs, match materials to your trail, and build a shortlist you can test before a long trip. You will finish with a clear decision framework and a checklist you can use in any gear shop or product listing.
Start With Your Base Weight and Carry Load
Before you look at a single pack, do the math. A through hiker’s pack weight is the sum of base weight (everything except consumables), food and water. Many long-distance hikers aim for a base weight under about 10 pounds for ultralight setups, while more traditional kits often land between 15 and 20 pounds. Your pack needs to carry the total you actually expect, not the total you hope for.
Shopping for one? See our guide: 4 Best Hiking Backpack Women's (2026): Expert Picks.
A practical way to estimate your load:
- List every item in your base kit and weigh each one on a kitchen or digital scale. Round to the nearest tenth of an ounce.
- Add up the base weight, then add your heaviest realistic food and water load. A typical resupply stretch might mean 4 to 6 pounds of food, plus 2 to 4 liters of water when water sources are sparse.
- Add a 10 to 15 percent margin for items you will pick up along the way or forget to remove.
The resulting number is your design load. Most manufacturers specify a recommended maximum load for each pack, and owners often report that comfort degrades noticeably once they go past that figure. Treat the manufacturer’s recommendation as a ceiling, not a target.
Choose the Right Pack Volume
Through hiking packs usually fall into three volume bands. Your gear list and resupply strategy determine which band fits.
| Volume range (liters) | Typical base weight | Best fit |
|---|---|---|
| 35 to 50 | Under 10 lb | Ultralight hikers with frequent town stops and light food loads |
| 50 to 65 | 10 to 15 lb | Most thru-hikers on mixed terrain, with moderate resupply intervals |
| 65 and up | 15 lb and above | Winter or cold-weather setups, long food carries, or remote routes |
Volume is not just about fitting gear. A pack that is too large tempts you to carry extra items, and that added weight accumulates quickly over hundreds of miles. A pack that is too small forces you to strap things to the outside, which shifts the center of gravity and rubs on your back. Aim for the smallest volume that holds your full kit with some room to spare for food and layers.
Evaluate Frame and Suspension Design
The suspension system is what separates a pack that feels good at mile 5 from one that still feels good at mile 500. Three components matter most.
Frame type
Packs generally use one of three frame approaches:
- Frameless or minimal stays: Lighter and simpler, but they rely heavily on a well-packed sleeping pad or rigid sheet. Best for base weights under about 10 pounds.
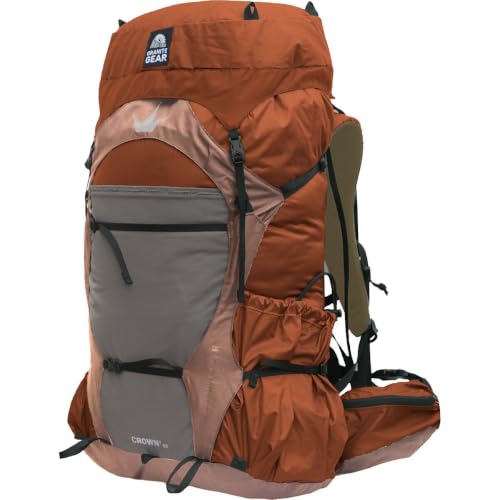
- Internal aluminum or composite stays: The most common choice for through hiking. They transfer weight to the hips and hold shape without adding much bulk.
- External frames: Heavier and less common among long-distance hikers today, but some owners prefer them for very heavy loads and good ventilation.
Hip belt
Most of your load should rest on your hips, not your shoulders. Check that the hip belt wraps the iliac crest (the top of your hip bones) and that padding is firm enough to hold weight without bottoming out. Hip belts that are too short or too soft tend to push the load onto the shoulders, which is a common source of sore trapezius muscles on long days.
Shoulder straps and load lifters
Load lifter straps should angle roughly 45 degrees from the shoulder straps toward the top of the pack. They pull the upper part of the load closer to your back. Check that the shoulder straps curve around your shoulders without gapping at the top, and that the sternum strap moves freely.
Torso length fit
Torso length is the most important fit measurement. Measure from the bony bump at the base of your neck (C7 vertebra) down to the top of your hip bones, roughly where the hip belt sits. Many packs come in multiple torso sizes, and sizing up or down by even an inch can change how weight distributes.
Match Materials to Your Trail and Climate
Fabric choice affects weight, durability and how the pack handles rain. Lighter fabrics such as silnylon or thin nylon ripstop save ounces but abrade more quickly against rock and brush. Heavier denier nylon or Cordura-style fabrics hold up better on rough trail sections and off-trail travel. Most through hikers accept some compromise and plan to repair seams or patch wear spots during resupply stops.
Water resistance is worth checking separately. Many packs use a DWR (durable water repellent) coating, which sheds light rain but does not keep a soaked pack dry. For wet regions, a pack liner or a rain cover offers more protection. Confirm which one the manufacturer includes before you buy, since specs vary by model.
Plan Pocket and Access Layout
Through hikers reach for water, snacks, a map or a rain shell dozens of times a day. Look for:
- Two side water bottle pockets that you can reach while wearing the pack, ideally with elastic or stretchy mesh.
- A hip belt pocket sized for a phone, snacks or a small toiletry kit.
- A top lid or front stash pocket for items you need often.
- A top-loading or panel-loading main compartment. Top loaders are simpler and lighter; panel loaders offer easier access to the bottom of the pack.
If you already use packing cubes or compression sacks inside your main compartment, check the internal dimensions. Many hikers organize their kit into a sleep system bag, a clothing bag and a food bag, so a pack with a clean, open main compartment usually works better than one with a lot of internal divider panels.
Build a Shortlist and Test It
Narrow your options with a simple checklist:
- Does the pack’s recommended maximum load cover your design load?
- Does it come in a torso length that matches your measurement?
- Does the hip belt fit your iliac crest without pinching?
- Are the water bottle pockets reachable while wearing the pack?
- Is the fabric weight acceptable for your base weight goal?
- Does the return policy let you load the pack with 20 to 30 pounds and walk around the house or a local trail?
Testing matters more than specifications. Load the pack with weight that approximates your real kit, walk at least 30 minutes, and check for pressure points, shifting and shoulder fatigue. Adjust the hip belt and load lifters, then test again. If the pack still feels off, it is probably not the right one for your body or your trail.
Common Mistakes
- Buying the largest pack available. Extra volume invites extra weight. Start with a smaller volume and adjust only if you have real gaps in your kit.
- Ignoring torso length. A pack that fits your height but not your torso will ride poorly no matter how well it is adjusted.
- Testing only with an empty pack. Suspension problems often show up only once the load is near your real weight.
- Trusting the marketed weight alone. Pack weights can vary by size and included accessories. Weigh the exact model and size you plan to carry.
- Skipping repairs. Through hikers commonly patch fabric and replace worn webbing. Carry a small repair kit and check seams at each resupply.
Tips for Long-Distance Packing
- Keep heavy items close to your back and centered between your shoulder blades.
- Pack your sleeping bag at the bottom only if your pack has a dedicated compartment for it; otherwise, place it midway to avoid pressure on your lower back.
- Use a dry bag or pack liner for your sleep system, even if the pack claims water resistance.
- Reassess your base weight after the first week. Most hikers find one or two items they no longer need.
- If you plan to organize with cubes or compression sacks, check whether they fit inside your pack’s main compartment before you commit to a set. For more on this, see Best Packing Cubes and Best Compression Packing Cubes.
Recommended gear
The pieces below support a through hiking setup. Pick based on your trail, climate and carry style rather than chasing a single model.
- Hydration bladder with hose routing: A bladder reduces the need to stop and dig out bottles, which helps on long water-scarce sections. View on Amazon
- Pack liner or roll-top dry bag: A liner protects your sleep system and clothing during rain and river crossings. View on Amazon
- Hip belt pocket organizer: A small pouch keeps snacks, a phone and a map within easy reach. View on Amazon
- Compression sacks: Compression reduces bulk and keeps clothing organized inside a larger main compartment. View on Amazon
For related reading on hiking-focused daypacks and weatherproof options, see 9 Best North Face Waterproof Daypack Options for Wet Weather Hiking and 7 Best North Face Recon Daypack Options for Everyday Carry (2026).
FAQ
What volume backpack do most through hikers use?
Many through hikers choose a pack in the 50 to 65 liter range, which balances carrying capacity with a manageable base weight. Ultralight hikers often go smaller, while cold-weather or long-resupply trips may need more.
How much weight should a through hiking pack carry?
Most manufacturers specify a recommended maximum load. Plan your total pack weight, including food and water, to stay under that figure, and aim for a comfortable margin below it.
Is an internal frame better than a frameless pack for long trails?
For most through hikers carrying loads above about 15 pounds, an internal frame or stays improve comfort and load transfer. Frameless packs work well for very light setups with a firm sleeping pad.
How do I know if a pack fits my torso?
Measure from the C7 vertebra at the base of your neck to the top of your hip bones. Compare the result with the manufacturer’s torso size chart, and check fit by loading the pack and adjusting the hip belt and load lifters.
Do through hiking packs need to be waterproof?
Most are water-resistant rather than fully waterproof. A pack liner or dry bags for critical gear is the usual approach, especially in wet climates.
How long do through hiking backpacks last?
Lifespan depends on use, fabric and care. Owners often report that seams and webbing need attention over several thousand miles, and many hikers patch or replace parts during a long trip.
Should I consult a professional about fit or back pain?
If you have ongoing back, shoulder or hip pain, especially with a history of injury, consult a physical therapist, sports medicine clinician or qualified outfitter before choosing a load-bearing pack.
Conclusion
The best backpack for through hiking matches your design load, torso length and trail conditions, with a suspension that transfers weight to your hips. Start with your base weight math, narrow the volume range, and test any shortlisted pack with a realistic load before you commit. Careful fit and a tested setup will do more for your long-distance comfort than any single feature on a spec sheet.
Related reading
- Best Photography Backpack for Hiking: 7 Factors and Packing Tips
- Waterproof Backpack for Hiking: How to Choose One That Keeps Gear Dry
Ready to choose one?
About Colin Foster
Colin Foster is part of our editorial team and reviews and edits our backpacks & packing systems guides, checking product details against manufacturer specifications and owner feedback.